Bargus
- Grace (2010)
- The Visitor (2010)
- NDP Philo Café (2006)
- Dead on Time (2005)
- The Joy of Etymology (17) (2004)
- The Bear (2003)
- American Tale The New Root
- Love's Sick Disease Seagull Strange
- La La La Ley Seagull Strange
- Music Video ProductionNeed a video? Find out more!
Please enable Javascript to browse our website.
Removing Sharpening Artifacts
Contents
1. Introduction
2. Application
3. Examples
4. Conclusion
Downloads
After Effects Preset (.zip 2kb)
Application
Before I start I'd like to say that this guide is aimed at a user of Adobe After Effects who knows their way around the software relatively well and that the version I used at the time of writing was 6.5. The Effects Preset file is for that version (it may be backward compatible, I'm not certain).
In this part of the article I will go through the different stages of effects processing the preset applies to the footage so you can grasp precisely how it achieves its results (this should be of use to those of you who may want to implement this in a different piece of software). I will also explain how to use the Preset and what controls are useful in everyday use.

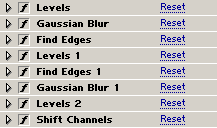
The collasped Effects Stack.
The supplied Effects Preset applies 8 stages of effects processing to a video source, when collasped they should be in the order as seen on the right. Each effect affects the resulting output from the effects above it in the stack. I will now explain what each of these Effects does.
Levels
This first Levels effect is used as a master control to change which edges are given priority. This is one of the key controls. Moving the gamma point is usually all that's needed to find the best amount of halo reduction and minimizing noise.
Gaussian Blur
The first Gaussian Blur in the stack has a Blurriness of 1.0. The blur's purpose is to dismiss the very fine detail and noise so only the strongest edges left, minimizing any artifacts that could occur from the processing.
Find Edges
This Find Edges effect does what its name implies - from the blurred image it shows only the edges within the picture. We need this output so we can begin to isolate the edges we want to affect.
Levels 1
The second Levels effect has its Input White set to 25.0. What this does is remove the finer edges and noise from the Find Edges output, which is critically important otherwise the final image will be full of noise and overly dark details.
Find Edges 1
This Find Edges effect takes the edges we found before makes an edge around them. An edge which resembles the halos the camera produces.
Gaussian Blur 1
This Gaussian Blur effect applies a tiny amount (0.6) of blur to the result from the filters above to just soften and expand the edges for the next effect.
Levels 2
This third Levels effect is used to change the width of our edges to match those of the halos in the source material. By sliding the gamma point to the left you'll shrink the edges and to the right you'll expand them. You'll need to tweak this control to get the best results.
Shift Channels
We use the Shift Channels effect to remove all the colour from the output of the filters, at this stage the colours are very over-saturated and will negatively affect the final image when applied to the footage. This is the final stage in the stack and leaves us with a grayscale output.
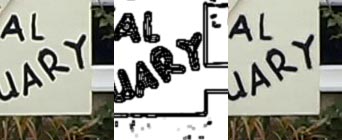
The Final Result
What all of these effects have done to a source is filtered out the high contrast boundaries, the boundaries which are most likely to have halos formed around their edges and produced a grayscale output which, when placed ontop of the original source, cancels them out.


Applying to Footage

To use the Effects Preset on some footage, import your footage into After Effects, create a Composition and move your footage into it, then duplicate (copy and paste on the selected layer works fine) it so you have two layers of the same material both synchronised in the timeline (mute the soundtrack for one). Now apply the Effects Preset to the top layer, set the blending mode on the same layer to Multiply and change the opacity until your halos are gone! 12% is normally what I use for XL1 footage.


